Sunday 31 July 2016

White halterneck tank

Hello all! Today I have a very simple white tank to share with you. This is one of the instances where a garment I make is directly inspired by clothes on the high street. There are lots of these cropped halterneck tanks floating around, but I knew I could make one from scraps of jersey I already owned and one that fit better to boot.

I used the same raglan tee pattern from 'Sew U Home Stretch' that I used for my Frieda Kahlo blouse which just goes to show how versatile a pattern can be. This time I just omitted the sleeves, keeping the cropped length.

It took no time at all to put together. The only alterations I made were to take the side seams in a couple of inches either side for a closer fit, although I could have tapered it in a bit more at the waist.
The front and back neckline are joined together by foldover elastic which was perfect for this purpose. Using foldover elastic in the past has been touch and go for me, but in this instance it worked well.
This top is a fantastic staple for my summer wardrobe because it goes with everything, and as a result I think it will get a lot of wear.

There are already a lot of memories attached to this top as shortly after this pictures were taken I got buried in a sand hole. In fact the very same top is still covered in sand sitting in a bag waiting for me to dust it off a bit. I really should get on that.

Thanks for reading and to Paul Salmon for the majority of photos and to Amy K for the last two,
Lauren xx

Monday 25 July 2016

Sewing dare 2016: Frieda Kahlo inspired top

Hello all! I've just come home from a week of gallivanting around England, visiting uni friends at various destinations. This photos were taken on a gorgeous beach in Wales.
I signed up to Gillian of Crafting a Rainbow's sewing dares again this year, as there's nothing like a challenge to give you a bit of sewing inspiration. Last year I made a quilt which is one of my most used things ever.
This year my challenge was to make something inspired by an artist. I took this to mean something worn by an artist and as Frieda Kahlo's style is fantastic I thought I'd take a leaf out of her book. After having a bit of a Frieda browse on Pinterest I chose to make an off the shoulder top inspired by this picture.  I love love love the off the shoulder trend that's happening at the moment. I said I wasn't done when I made my jumpsuit and I'm still not done after making this top.
I started off with the raglan tee pattern from 'Sew U Home Stretch' which is made for knits, but was a good base. I folded down the neckline on the front, back and sleeve pieces to make it off the shoulder and I added a great deal of width to all 3 pieces, so the top would be nice and full. I added more width to the front than the back so I'd have a bit more coverage.

The fabric I used I think is a georgette, which is a bit heavier than chiffon. It was a caftan that I inherited from my Grandma. I had originally cut a Zeena dress out with it but never sewed it together. When I looked for fabric for my top it was perfect so I cut the front and back out of the skirt pieces and the sleeves out of scraps. 
The fabric is a bit sheer but is decent enough with nipple covers to hide the important bits. I looked at white and clear elastic to thread through the channels at the sleeves, neckline and hem and in the end went for the clear elastic because the white could be seen through the fabric. Clear elastic is invisible through the channels but it isn't the best. I think a navy elastic would be stronger and have better give than the clear elastic I used.
The insides are all finished with french seams because my overlocker was broken but also because it makes me happy to look at. I love this top a lot and it wouldn't have existed without Gillian's sewing dares so thank you Gillian and thank you to Regan Louise for coming up with a fab dare for me.
Thanks for reading, to Paul for being my photographer this holiday and to MK for her fab beach.
Lauren xx


Friday 15 July 2016

Funky Trousers

Hello all! This months Minerva make is these funky trousers. I've worn my black ones almost non stop and I thought it would be great to have another pair to travel in on our trip to France later this summer. This was one of those makes that I thought would be quick and easy. Obviously the sewing gods sussed this and decided to spite me by making it quite a challenge. It was my fault really. I was very particular about how I wanted the border print, which caused quite a few problems.
You can read the full post at Minerva here

Thanks for reading, to Minerva Crafts for providing the kit for this make and to my brother taking photos twice because in the first set I had a very annoying piece of dangly hair that was ruining the whole aesthetic.
Lauren xx


Wednesday 13 July 2016

Begin again trousers!

 Hello all! I'm very excited to be taking part of the Vintage Pledge July Extravaganza, as I have of late fallen out of practice with using vintage patterns and I have missed them. The making of these trousers was a bit of an extravaganza in itself, but I got there at the end.
I have decided that 'Begin Again', starring Keira Knightly, is one of my favourite films. Her characters wardrobe is to die for. So simply chic, so elegantly nonchalant. I wanted some of her elegant nonchalance for myself so I set about making a version of her navy pleated high waisted trousers for myself. The pattern I used was New Look 6871, which I heavily suspect is from the 80s, although I can't find any solid proof to confirm that. It features a high waisted trouser, pleated at the waist with a slightly tapered leg. Bingo.
I sewed them up in some gorgeous navy blue linen, found at Goldhawk Road for around £12 per metre. I was running out of money at this point so I had to stop at 1 metre which wasn't quite enough for full length trousers. It's alright, I was going for the cropped look anyway. I do wish that I had enough for pockets and cuffs. They would have been the icing on the cake.
The sewing up went super smoothly until I got to the fly front. This was a nightmare. I attempted to understand the patterns instructions and then looked at Heathers Ginger Jeans fly insertion post and then got thoroughly confused and went back to the pattern instructions again. I think I ended up sewing some sort of fancy lapped zip by accident.

Next time I would add the fly onto the pattern pieces instead of cutting them separately like the pattern dictates. This way I could follow Heathers instructions properly. I'm still not happy with how it looks, as the metal part of the zip is really obvious so I think I'll rip it out, sew that seam up and insert an invisible zip down the side seam instead.
 I am really pleased with the fit though. I was expecting to have to pinch out masses of ease but they are perfect. The first time I tried them on I practically cried, because they are so out of my comfort zone, style wise and I felt horrible in them. They are just a totally different style, and I must admit, they are growing on me!

Thanks very much to Kerry and Marie for having me, and to Mum for taking these pictures! This post was originally published here.
Lauren xx

Saturday 9 July 2016

Summer ball dress 2016!

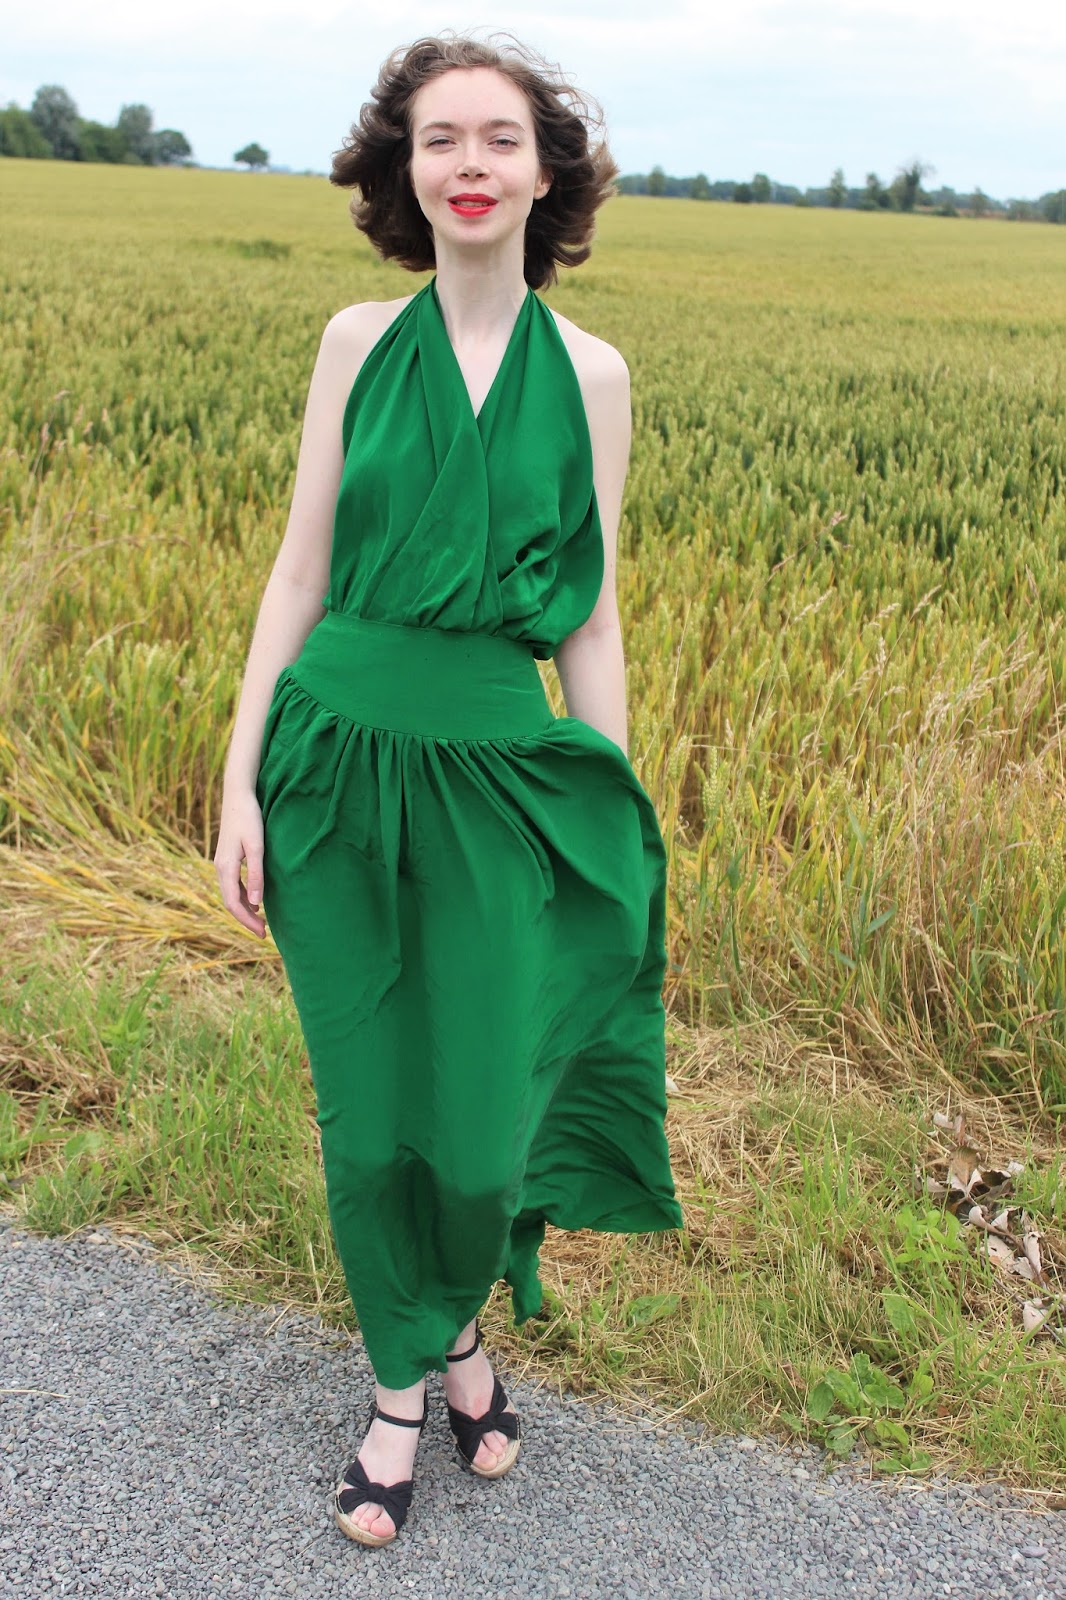
Hello all! Today I have to present to you: this years Summer Ball dress, to end my first year of uni. Before I begin, in this photoshoot it was blowing a gale and it seems I completely lost my ability to form any passably attractive facial expression, so if you could just glaze over the very prominent outline of my legs and my stupid face that would be great.
I always knew that I wanted to use the drop waisted Vogue pattern for the skirt, which I used for a dress a few months back. I knew I wanted a halterneck type bodice which was gathered into the waist. And finally I wanted it to be emerald green silk.

I found the emerald silk from Goldhawk road for £12 and bought the rest of the bolt which was just over 3 metres just before Easter. Cut to the last week of term, in at uni 10-5 , a flood of other peoples alterations for Summer Ball and the Ball itself on Friday night. In the end I had about 6 hours to put this dress together. As the guys on sewing bee know; this is not long enough.
I planned to drape the bodice and just lengthen the skirt from the pattern so I decided to work on the skirt first. Thursday night, 9pm: the making begins. I ended up just using the yoke pieces and the tops of the skirt pieces from the pattern, using 2 rectangles of fabric gathered into the skirt instead of a trapeze shape, with the top of each rectangle vaguely resembling the shape of the yoke.
 I interfaced the yoke to give it a bit more structure which turned out to be a good shout. It did need taking in a bit on either side so it sat properly at my waist. 1 of the side seams turned out a bit funky. I didn't cut very carefully so it's probably horribly off grain. 11pm: Sort out Benjie's trouser hems.
I tried draping the bodice halterneck style but it just wasn't working for me. I take the only scraps left from the skirt, knot them at the back of the neck, tuck them in at the waist. I thought that looked alright, and I was falling asleep at this point so called it at night at 2am.
Friday afternoon: 3pm. Put straws in hair. Attach bottom of bodice to skirt. Handpick the invisible zip into the centre back seam because zipper foot is no where to be found and time is flying at the speed of light. 4.30pm: Roll hem all edges of the bodice. 5pm: have disgusting kebabs for tea which were far too hot and even Philadelphia couldn't cool them down.

5.30pm: Get nice friend Amy to level off the hem. Realise that no hemming is going to happen and just say positively, "At least the fabric doesn't fray so much". Find and apply nipple covers. 6pm: Look in the mirror and cry a little inside. Take out straws and do make up. Make way for thoroughfare of people coming in to use the iron. 7.30pm: Iron! 7.45pm: turn up at pre drinks that started at 6.30. 
I really quite dislike this dress. I think it makes me look like a lampshade. It did get finished enough to wear though. My tactic was to dance so hard that no one got a chance to see that I looked like a lampshade and I think it worked. A few compliments did float my way. I love the fabric though so I think I'm going to rip up this dress and remake it into this dress.

Thanks for reading, to Amy for all of her help and to Edward for taking pics in our local field!
Lauren xx


Tuesday 5 July 2016

Comfy pants!

Hello all! It seems so wrong to call these comfy pants, but it seems worse to call them comfy trousers, so comfy pants they are! I bought a metre of black jersey because I was panicking about not having enough black clothes for something, but the event passed and I was left with a metre of black jersey on my hands.
This year has truly been the year of loungewear for me. I lived in uni halls from September to June and I needed something comfy to change into between getting home from uni and going to bed. It's basically been a year of loose knit tees and Hudson pants. So I decided that this fabric would be well worth it's £4.99 price tag if it were made into loungewear. Never mind that I only got round to finishing them after uni had finished. I haven't taken them off all week! (n.b. that was exaggerating for comedic purposes. I did wear a few other things. Just a few though.)
I tried to knock them together before a family outing one Sunday while I was back home for the weekend a few months ago, but surprisingly it didn't quite work out. I was super close, but then the overlocker needle snapped and it was game over. On a side note, this camera angle has done wonders for my derrière.
They were super easy to put together though. I've even drawn you up a handy little diagram. To draft my pattern I folded both selvedges into the centre of the fabric. I put my crotches in the centre but it actually makes much more sense to put them on the edges cuz that's 2 less seams to sew! I then cut down the middle, and cut off some width at the end for the waistband and cuffs.
To sew them together, you  need to sew the crotch seams up and sew the side seams up. I then gathered the waist with elastic and sewed it to the waistband right sides together. I tried to gather the cuffs with elastic but there was too much volume to gather it to the elastic and I broke a needle while trying, so I abandoned the elastic and gathered it straight onto the cuff, which was roughly the width of my ankle. I sewed one cuff without marking the side seams on the legs and cuff and one matching the side seams together and the gathering is so much more even on the second.
I am so pleased with how well these turned out! They are super super comfy and I would like them in all the colours of the rainbow.
Thanks for reading and to Emma for taking pictures! I hope this kind of tutorial is kind of coherent. If you have any questions, please let me know below!
Lauren xx