Monday, 26 May 2014

Strapless Maxi

 Hi! Today I have to share with you my latest project, a floral strapless maxi dress. This dress wasn't made for any particular purpose, but just because I wanted to. My exams are all done, I've sewn a lot of cake and now it's time for some frosting. This dress has undergone a great many transformations from my original design which was inspired by this picture found on pinterest. However when I adapted my sloper to fit with this design it just didn't work with my body shape. My shoulders are too rounded for the straps to sit properly. Then there was plan B which involved cutting off straps and making it a halterneck bodice instead. This didn't work out because there was far too much gape-age exactly where there shouldn't be so I abandoned that and went onto plan C, which is the dress you see before you.

The bodice I used was this one from Lekala from which I cut off the straps. The skirt is a full gathered one from style 1004 which I also used for last years prom dress. I'm really happy with the fit which is pretty much spot on. 
Because the dress is strapless I added boning to all of the bodice seams apart from the centre back where the zip went. This was done by sewing it directly into the pressed open seams on the lining which I used calico for to give it some sturdiness because the crepe is very slippery and lightweight. Sorry I can't get the rotation how it's supposed to be but you get the idea. 
I'm really pleased with the construction of the dress. Every piece was overlocked first because the crepe frayed like crazy and all of the bodice seams are hidden by the lining. My hair by the way, I curled with straws last night. It works surprisingly well! The flower crown I made with fake flowers for prom last year.
When I tried on the strapless bodice muslin I was concerned about how flat I looked in my already not-very-endowed chest. After reassurances from friends I realised that I need to stop trying to make my body fit the worlds beauty standards. So what if this dress doesn't make my chest look big? I still like how it looks, and that's all that matters. 

The dress in total used 5 metres of fabric, making it my most expensive garment to date, totaling at 25 pounds. The fabric I found here, even though it's polyester the print was just too gorgeous to say no to. The colours are just amazing.


I really love how my hair looks fake bobbed in this photo. Will bear that in mind later for future reference.

I love how the dress looks like a jumpsuit here. 


Above all, I just love how HAPPY this dress makes me. And thats what clothes are for. Yes they are also to make sure that you don't go to prison for indecent public exposure, but for me they are more than that. They give me the confidance to be the best version of me that I can be. 

Thanks so much for reading!
Lauren xx


Thursday, 22 May 2014

Holiday Capsule Wardrobe Planning

This summer my family and I are going on a holiday of a lifetime to Australia for 3 weeks: 4 days in Singapore, a week in Perth, a week in Sydney and the rest at the Great Barrier Reef. This adds up to 21 days of travelling. When I travel, instead of picking up fridge magnets and key rings as souvenirs I pick up fabric, and I have been assured that Singapore at least is a treasure trove for fabric. I was slightly concerned about fitting all of my new fabric in my suitcase to take home with me so my plan is to take a practically empty suitcase to fill up as we go from place to place.

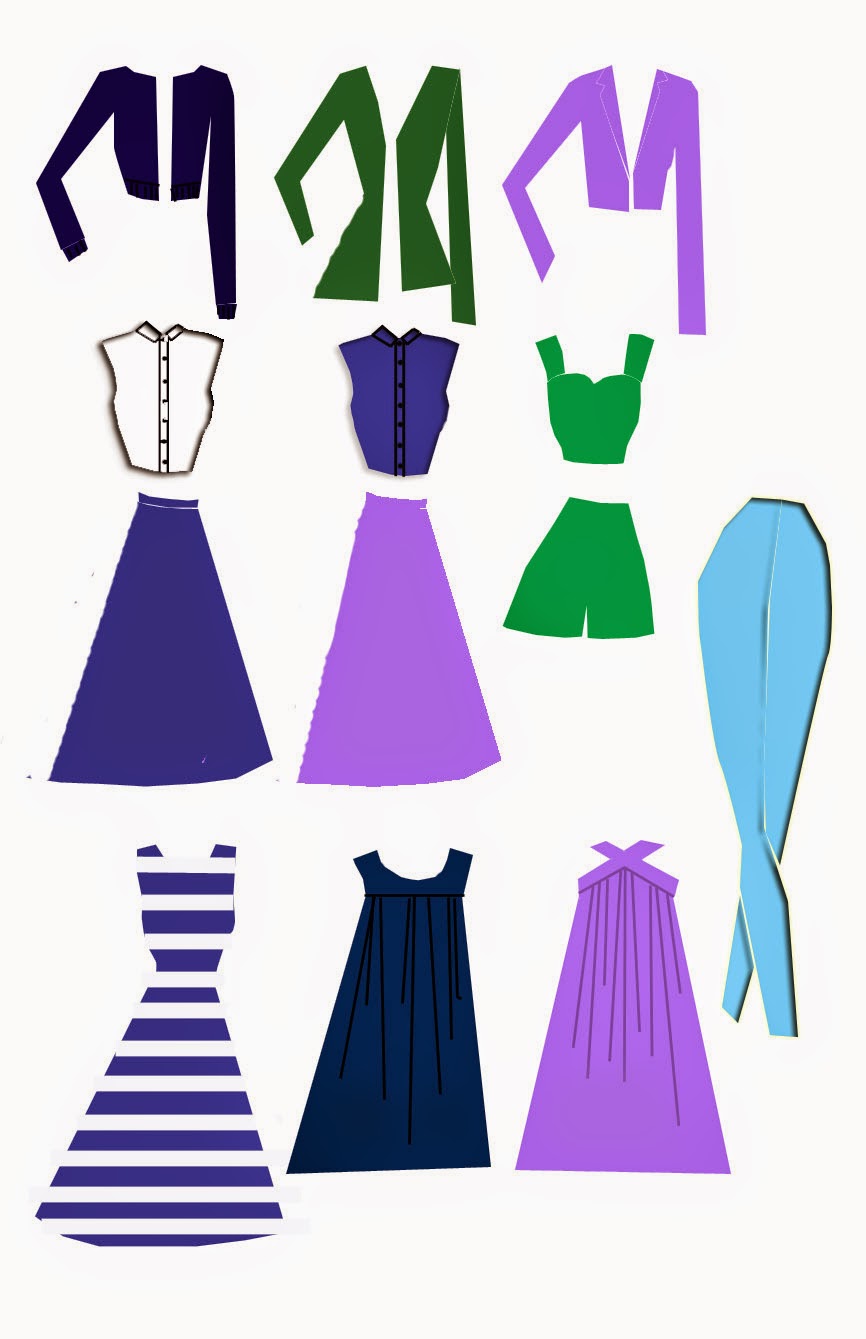
 This called for a capsule wardrobe. My challenge is to wear a different outfit for each of the 21 days from 13 pieces of clothing. This will be made more difficult by Singapore's summer weather and Australia's winter weather. The reason I'm planning so far ahead is because I actually only possess 2 of the 13 pieces of clothing. If it makes it slightly better I do own the fabric for 5 of the 11 remaining pieces. Plus I own all of the patterns apart from 1 so that isn't too bad.

Whilst planning and preparing my capsule wardrobe I focused on a specific colour palette. White and navy are my neutrals. Olive is my nearly neutral and purple and other blues are my accent colours. 


Outerwear (row 1)
For my outerwear I've chosen to make a navy lace bomber jacket (underlined with a ponte knit). For this I'm going to use the hoodie pattern from Sew U Home Stretch without the hood.
I already own an olive jacket but because it's supposed to be a mens jacket it has no waist definition so I do want to sew bias binding around where my natural waistline hits so I can thread cord through it.
 The last item of outerwear is going to be a purple Victoria blazer which is the item that I need to buy the pattern for. I'm planning to make this out of purple ponte for comforts sake and to minimise wrinkles from being in a suitcase.

Tops (row 2)
I chose to use shirts instead of t-shirts because I feel more together in them and also because I can tuck them into skirts and knot them on top of dresses making them super versatile. I already have a refashioned white shirt and am planning to make the navy one using the archer pattern using a navy bed-sheet I found in the charity shop for 2.50. I'm also planning to make a bustier using an amazing navy and green floral fabric found in the charity shop for 3.99 for 2 metres. Obviously I couldn't let that one go. I'm also planning to make matching shorts to go with it so it can be a super cute playsuit.

Bottoms (row 3)
I'm planning to make 2 basic half circle skirts in ponte knit which will be super comfy and easy to travel in. Highwaisted jeans are also on the cards as I love wearing jeans, but only high-waisted ones work on my and I don't currently own any! I have some size 18 jeans from the charity shop which cost 3.50 and I'm going to cut a new pair out of.

Dresses (row 4)
The first dress will be a classic fit and flare dress using my sloper and I'm really looking forward to doing some interesting dart manipulation with the stripes on the bodice. The navy dress is gathered into a yoke with an A line silhouette. I've been really wanting these looser dresses for hot days so this should be perfect. The purple dress is the same kinda thing apart from the angled yoke and the cross over straps. I'm planning to use this awesome purple tie-dye fabric that I inherited from my Grandma. Both dresses I'm planning to draft using my sloper as a base.

I did some basic drawings on photoshop all drawn to fit a croquis so could create outfits by making the things I wanted visible and the things I didn't want visible could be made invisible. To see how useful certain items would be I created every outfit possible with them. The items that could only be worn with a few items were nixed. I'm so sad that the wide legged polka dot linen trousers didn't make it. They were going to be SO GOOD. Maybe when I've finished making all of this lot...

Here's an example of the outfits I made to go with the white shirt.


That's all my thoughts on capsule wardrobes so far. Expect to see some of these items cropping up in the near future!
Thanks so much for reading!
Lauren xx

Tuesday, 20 May 2014

Floral Pinafore

Way back in January Emma, one of my closest friends, asked for my help because she wanted to make her sister Lucy a pinafore for her birthday, and I of course said YES, so here it is! Emma did practically all of it, with a bit of guidance from myself.


We didn't use a pattern but used one of Lucy's existing pinafores for the bib and drafted a circle skirt to go with it. The straps are just long rectangles which cross over at the back. The beautiful photos were taken in Worcester College in Oxford where Lucy goes to uni.


I had great fun making the pinafore with Emma, and it was really nice to teach somebody a bit of what I've learnt so far.
I have my last A Level exam tomorrow so very very soon I'll have time to sew up the millions of projects that are in my head!
Thanks very much for reading!
Lauren xx

Thursday, 15 May 2014

Sleeveless floral archer

Hi! Today I present to you my first every shirt! And of course I used the Grainline Studios Archer pattern. I have a lot of shirts on my list to make but I chose to make this one so it would fit in with the floral week at Project Sewn. I also chose to make this floral one first because I only had 1 metre of it (bought in France last summer) and I wanted to do a couple of new things at a time, i.e. if I made a sleeveless Archer I don't have to worry about cuffs and whatnot and can focus on the other new things like buttonholes and a collar. 
The only issue I really had was that I was arrogant enough to assume that if I just left out the sleeves it'd be fine. It wasn't. There was some serious gape-age in the armhole department. After some googling I found this helpful tutorial made by Jen herself which would have worked a lot better than my "I'll just take in the side seams and it'll be fine". But in the end, it isn't that bad, but next time I will follow her instructions.
Apart from that it's all pretty much okay I think. I must have not done the collar quite right because if I wanted to do the top button up the collar crosses over so I'll try and figure that out for next time. I really need to buy another water soluble pen because there may be some orange dots marking out the buttonholes still on there... Talking of my first buttonholes, I have never been so tense in my life! I've tried them a numper of times before and the first one has been lovely and all the rest rubbish, but this time I reset the type of stitch each time which seemed to do the trick.
I love wearing the shirt tied up, but it also looks good tucked in. What it really needs are some high waisted jeans which are going to happen ASAP. I did also try pairing it with a maxi skirt, but I'm not convinced by the black, a navy or a lighter colour would be better. Also, I feel that it's too short for a maxi skirt. I had to wear it low-ish so it looked half decent. Looking at the print close up I'm not even sure it qualifies as floral? Reminds me a bit of camo really, apart from the colour scheme.

That's all that I can think to say at the moment.
Thanks so much for reading! I'll be linking up to this weeks project sewn sew along so if you like mine best of the bunch feel free to give it a heart when the voting begins tomorrow.
Lauren xx


Friday, 9 May 2014

Me-Made-May 2014 Week 1

  Here's my summary for my first week and a day of me-made-may 2014 :)

 1st May 

I wore an asymmetrical skirt that I wear all the time for school that just never got blogged.


 2nd May

I wore my me-made suit with a peplum top. Really really need to work on this posing thing.

3rd May

I wore my camden lady skater with my black hoodie. Both of these I wear to death and I really need more of them. A hoodie in every colour of the rainbow would be fantastic.

Day 4

I put a wrap skirt over a black dress. I have issues with this skirt. The fact is that it's fastened with poppers. Every time I move an inch, pop! and I'm half naked. This one is going to be going into the mending pile and the poppers replaced by buttons and buttonholes.


Day 5

I wore my floral top. Love this top, wear it all the time, need more of them.


Day 6

I wore my newly finished archer shirt for the first time! (I say finished, well no one can see the lack of a hem...) and my grey suit.


Day 7

Black pencil skirt. The waistband of this skirt was originally attached with snaps but this was also a grave mistake. Regrettably it took me over 6 months to change the snaps to hooks and eyes, and now I'm not feeling round the back of the waistband every 5 minutes to check it's still fastened which is a plus.

Day 8

I didn't even manage a selfie, but I wore my grey suit again with this red top that I wear to death and need to make a copy of.

Day 9

Today I wore my black half circle skirt which I love but attracts fluff like crazy :( Need to make one of these in navy.

That's me up to date! All the me-mades seen in this post can be found on my portfolio page, apart from the asymmetrical skirt from day 1.
Thanks for reading!
Lauren xx

Monday, 5 May 2014

Leading Ladies Challenge: Gathered purple circle skirt


My inspiration was from Lauren Bacalls outfit in the film Key Largo (1948). The aspects of her outfit that I took were the full gathered skirt and the white skirt. I love how simple and elegant this outfit is. 
Humphrey Bogart and Lauren Bacall - Key Largo (John Huston, 1948)
For the gathered circle skirt I added 5cm onto my normal circle skirt measurement, cut it out and gathered it to fit my waist measurement. I did struggle with keeping the gathers in place so in the end I gathered it with elastic, turned it over and top-stitched. However, it doesn't look quite right without a waistband so I wear a ribbon or a belt over it.

The skirt material is from one of two curtains that I bought from a charity shop for five pounds. They look and feel like silk dupion but are actually 100% polyester. Because of the added waist measurement the skirt is much shorter than I wanted it to be but thankfully it is still wearable...just. To conserve the length I did an improvised version of a narrow hem which consisted of an overlocked edge turned under and stitched about 1cm from the edge. I really love the extra fullness that the gathered circle skirt gives.


The shirt is one of dads that I refashioned about a year ago by removing the sleeves and collar, taking it in at the sides and elasticating the waist. On reflection I wish I hadn't gathered the waist because the gathering always shows if's tucked into anything and looks kinda weird.
I love this photo because I look like I'm about to fall on my face when I'm actually just running...

That's all I have to say about this outfit! Thanks to Project Sewn for inspiring me, because otherwise this skirt would never had existed! Oh and also thanks to Ed for taking photos.
Thanks for reading,
Lauren xx


Saturday, 3 May 2014

Drama costumes for Matilda Liar!

For my drama AS Level you get the choice to perform, do lighting, sound or costumes and of course I chose costumes and thought you might like to see them. The play we chose is called Matilda Liar. The rough outline is that Matilda tells lies and then takes a truth pill that she thinks is a slimming pill and gets into trouble with her family for bringing to the front all the truths that they don't want to face. The play ends with the start of act 2 again, with Matilda appearing without her tongue, preventing all of the horrors that happened previously.
We had to choose a practitioner to base our work on. Our group chose Berkoff, who uses very exaggerated and un-naturalistic movements in his plays. His style had to be conveyed through the costumes as well as the cautionary tale style of the play.

I'll start with Jordan's costume. He played the father who was the head of the family with all of the authority. He is quite a ridiculous character which I chose to enhance with a massive tie made in a disgusting fabric. This tie is the only coloured item, the rest of the costumes a monochromatic, which was a key feature of Berkoff's work. This demonstrated his superiority within the group as if only he was allowed to break the rules. I also gave him a hunch by stuffing a small pillow up his blazer to give him a slightly weird silhouette.

 This is Beth, who played the main character Matilda. This was her "lies" dress, worn at the beginning and ripped off to reveal a white dress when she learns that she's taken a truth drug. I used the Kitschy Coo Lady Skater dress pattern for both dresses, modifying the black one to have a buttonband down the centre front. . The neckline doesn't match up because I wanted an aspect of every costume to be not quite right, representing the family who seems okay at the start but falls apart as the truth starts being told.
The buttons are decorative because the dress is attached with velcro which made a great ripping sound when Matilda ripped it off in a fit of rage.
 Katie played the mother, a very aggressive character, who is imprisoned within the family, a slave to housework and so on. This is why I chose black and grey stripes because they remind me of prison uniforms. As you can see the stripes are completely off here, to add the element of something that isn't quite right.


I used the Lady Skater pattern for this dress as well, but had to hugely shorten the waist. It could do with a bit more shortening actually. I made it very loose to make it look ill-fitting and dowdy.To enhance katies silhouette I padded her bum using an old pillowcase and stuffing. There was originally padding in the boob area but it was taken out because we decided that there was enough in that area already.

And we put a spoon in her hair, because, just because...


And that's all of my costumes!
I was very lucky to work with an amazingly talented group of people, who all looked amazing in their costumes. I can't wait to do this as a job!
Thanks so much for reading and to Katie for her amazing facial expressions and pictures!
Lauren xx